EMAIL: sales@eseasongear.com
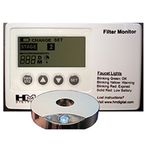
HM Digital FM-1: Filter Monitor
HM Digital FM-1 Filter Monitor, FM1
FM-1 Flow Switch The FM-1 includes a flow switch that can easily be attached to the product water line. The flow switch is used behind the scenes to operate the LED faucet indicator disc.
1 Year Warranty
CE
Where to buy: Find a distributor in your region.
The new Filter Monitor is an innovative system to alert when a filter needs to be changed via color-coded lights at the base of the faucet. The battery-powered FM-1 has five timers for a 5-stage system and programmable set-points and alarms for each function, all in a crisp, attractive housing. FEATURES
A five-stage filter monitor with five independent timers and a tri-color LED faucet indicator disc. Works on time (and volume for the FM-2) for up to five stages (can be less). The LED indicator disc will illuminate a green, yellow or red light when the water is turned on. The color indicates the percentage of elapsed time. Auto-Off function conserves battery power. The unit shuts off automatically after 5 minutes of non-use. The timer counts down in months or days (settings can be modified). Includes an audible alarm (beep). Modern design is perfect for any kitchen. Includes the FMS-1 Water Flow Switch. Installs quickly and easily.
SPECIFICATIONS
Timer Range: 0-999 days/months Timer Modes: Days or months (default is months) Settings: One alert per stage, up to five stages Default Setting: 12 months Batteries: 2 x AA (included) Battery Life: approx. 18 months Base Unit Dimensions: 100 x 63 23 mm (4 x 2.5 x 0.9 in) Base Unit Weight: 119 g (4.2 oz.) (including batteries) Flow Switch Cable Length: 93 cm (36.6 in) Flow Switch Fitting Size: 1/4" Quick Connect LED Faucet Indicator Disc Cable Length: 92 cm (36.25 in) LED Faucet Indicator Disc Dimensions: 4.75 (1 1/4" in.) dia., 8 cm (5/16") high
PATENTS PENDING
TO RESTART A STAGE TIMER AFTER A FILTER HAS BEEN CHANGED:
1. Press the PWR/STG button to turn the power on. 2. Press the PWR/STG button to advance to the stage that needs to be reset. 3. Press the SET button. "SET" will appear on the screen. 4. Press and hold the SET button for two seconds. The unit will beep twice and "SET" will disappear. 5. The timer for that stage has been reset and will begin counting down again. 6. Press and hold the PWR/STG button to turn the power off.
sales@eseasongear.com - We accept credit cards via PayPal, no PayPal account is required


